Fragment Configuration
Configure pipeline fragments in Control Hub Pipeline Designer. To design fragments, you must use an authoring Data Collector of version 3.2.0.0 or later.
Like a pipeline, you can use any stage available in the authoring Data Collector in the fragment -- from origins to processors, destinations, and executors.
You can configure runtime parameters in pipeline fragments to enable more flexible use of the fragment. You can also configure data rules and alerts, and data drift rules and alerts, to provide runtime notifications.
You can use data preview to help design and test the fragment, and use a test origin to provide data for data preview.
When the fragment is ready, publish the fragment using the Publish icon: ![]() .
After you publish a fragment, you can use the fragment in pipelines and use explicit
validation in the pipeline to validate the fragment.
.
After you publish a fragment, you can use the fragment in pipelines and use explicit
validation in the pipeline to validate the fragment.
Creating Pipeline Fragments
You can create a pipeline fragment based on a blank canvas or based on selected stages in a pipeline.
Using a Blank Canvas
Create a pipeline fragment from a blank canvas when you want to build the entire fragment from scratch.
-
From the Pipeline Fragments view, click the
Create New Pipeline Fragment icon:
 .
.
Using Pipeline Stages
You can create a pipeline fragment from one or more stages in a pipeline.
Fragment Input and Output
A published pipeline fragment displays in a pipeline as a fragment stage, with the input and output streams of the fragment stage representing the input and output streams of the fragment logic.
A fragment must include at least one open input or output stream. You cannot use a complete pipeline as a fragment.
When designing a pipeline fragment, consider carefully the number of input and output streams that you want to use. After you publish a fragment, you cannot change the number of input or output streams. This helps ensure that pipelines that use the fragment are not invalidated when you update the fragment.
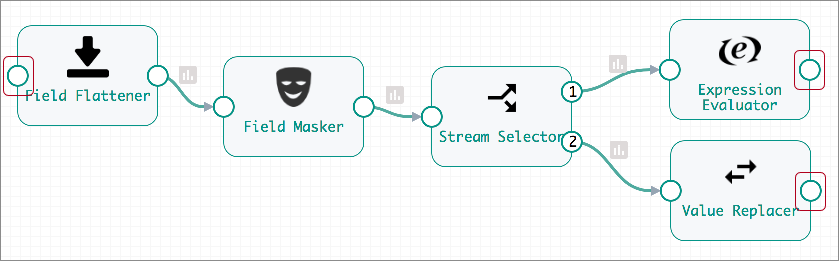
You can, however, change what the input and output streams represent. For example, the following Flatten and Mask fragment begins with one processor and ends with two processors. The input and output streams are highlighted below:
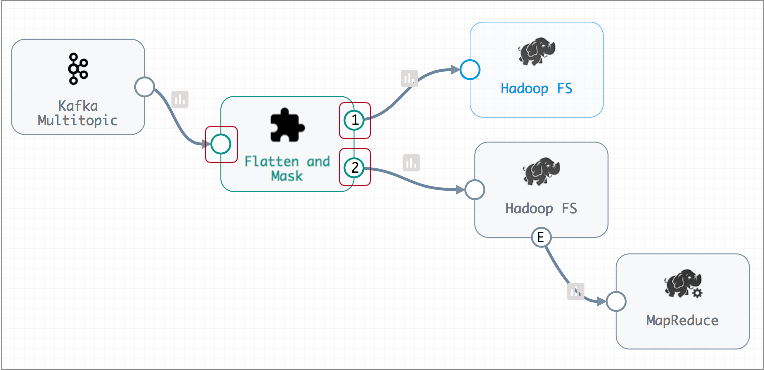
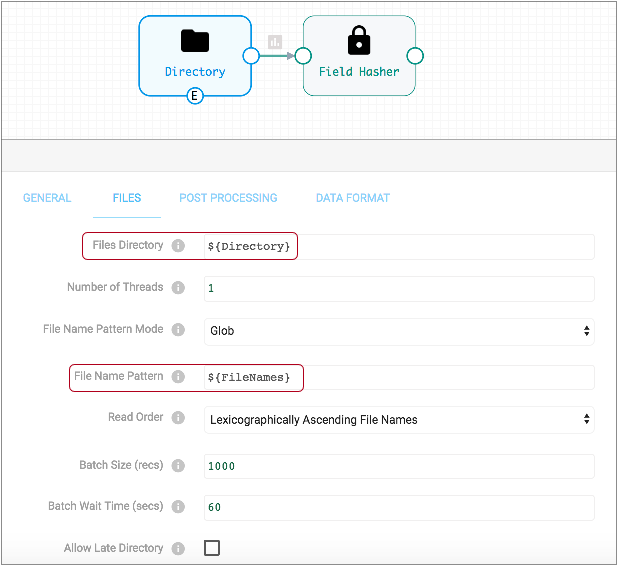
When you configure a pipeline, the Flatten and Mask fragment displays as a single fragment stage by default. The highlighted input and output streams of the Flatten and Mask fragment stage, represent the input and output streams of the fragment logic:
Subsequent versions of the Flatten and Mask fragment can change dramatically if needed, but must still include one input stream and two output streams.
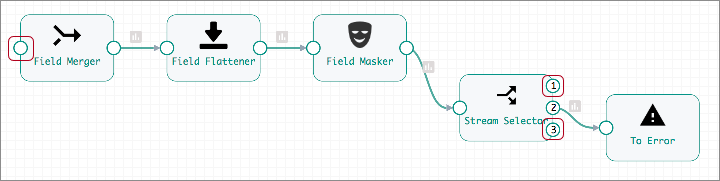
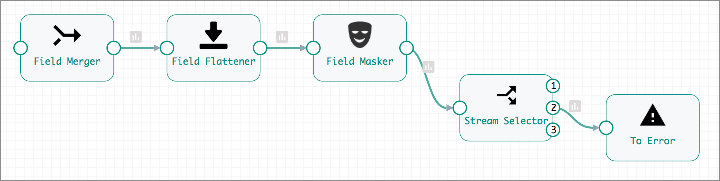
For example, the following Flatten and Mask version begins with a new Field Merger processor, and the processors after the Stream Selector have been removed. The Stream Selector also has an additional output stream that sends qualifying records to the pipeline for error handling. But despite these changes, the number of input and output streams remains the same, so these changes are valid:
Execution Engine and Execution Mode
When you create a fragment, you specify the execution engine for the fragment. When you configure a fragment, you specify the execution mode for the fragment, just as you would for a pipeline.
- Execution engine
- You specify the execution engine for a fragment when you create it: Data Collector or Data Collector Edge.
- Execution mode
- Define the execution mode for a fragment in the fragment properties, just like you define the execution mode for a pipeline in pipeline properties. You choose from standalone, edge, and a set of cluster execution modes.
Data and Data Drift Rules and Alerts
You can configure data rules and alerts and data drift rules and alerts in a pipeline fragment. When you use the fragment in a pipeline, the pipeline inherits the rules and alerts.
If you delete the fragment from the pipeline, the rules and alerts defined in the fragment are deleted as well.
For more information about data and data drift rules and alerts, see Rules and Alerts Overview.
Runtime Parameters
You can configure runtime parameters in pipeline fragments to enable more flexible use of the fragment.
- In the fragment - You define and call runtime parameters in a fragment. When you define a runtime parameter, you specify its default value.
- In a pipeline - When you add a fragment to a pipeline, the pipeline inherits all runtime parameters in the fragment. You can override the default value for a runtime parameter in the pipeline properties. You can also use the runtime parameter elsewhere in the pipeline. You cannot change how the parameter is called from the fragment, since the fragment cannot be edited from within the pipeline.
- In a job - When you configure a job for the pipeline, you can override the values for any runtime parameter defined in the pipeline.
When you add a fragment with runtime parameters to a pipeline, the pipeline inherits the parameters as defined. If a fragment update includes changes to the runtime parameter values and you configure the pipeline to use this fragment version, the pipeline inherits those changes as well.
Runtime parameters, once inherited, remain in the pipeline. If you later remove the fragment from the pipeline, the pipeline retains any runtime parameters inherited from the fragment until you delete them.
- Define the runtime parameter in the fragment properties.
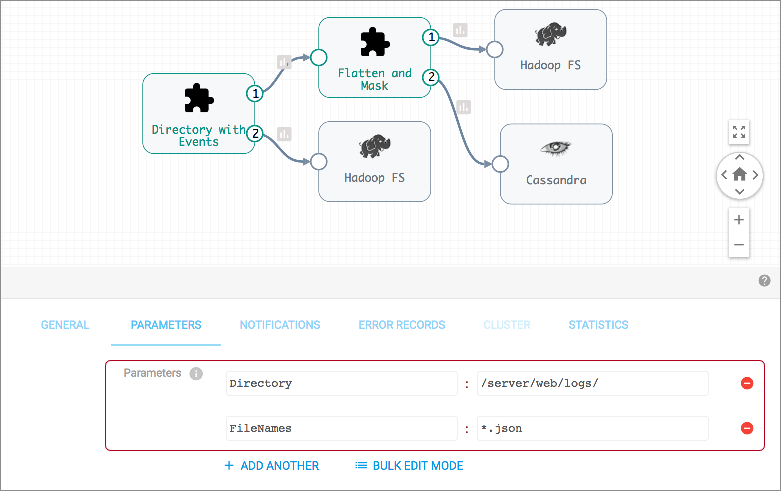
Specify the runtime parameter and default value on the Parameters tab of the pipeline fragment properties.
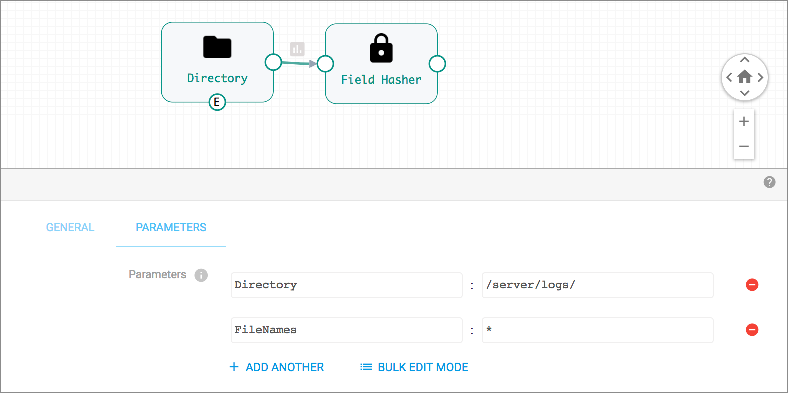
For example, the following image shows the Parameters tab of a fragment with two runtime parameters defined:
- To use the runtime parameter in a stage, configure the stage property to call
the runtime parameter.
Use the name of the runtime parameter in an expression, as follows:
${<runtime parameter name>}In this case, we want to use the parameters to define the Directory Template and File Name Pattern properties in the Directory origin, as follows:
- Publish the fragment, then add the fragment to a pipeline.
The runtime parameters are inherited with the default values defined in the fragment.
- In the pipeline, override the runtime parameter values as needed.
You can configure the values for runtime parameters on the Parameters tab of the pipeline properties, as follows:
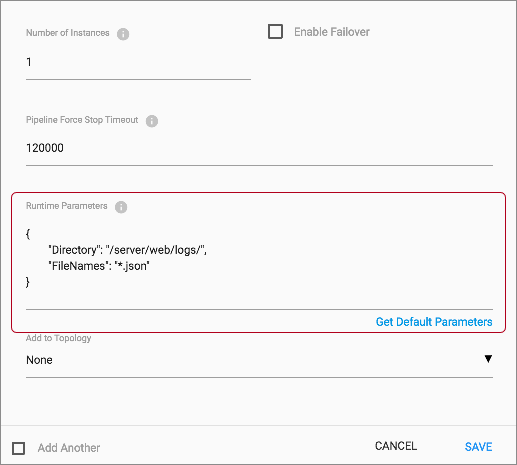
- When you create a job for the pipeline, review and override the runtime
parameter values as needed.
In the Add Job dialog box, use the Get Default Parameters link to retrieve the parameter definitions for the pipeline. Override the values as needed, then save the job configuration. The Get Default Parameters link displays beneath the Runtime Parameters property as follows:
Creating Additional Streams
When needed, you can use the Dev Identity processor to create an open input or output stream for a fragment.
The Dev Identity processor is a development stage that performs no processing, it simply passes a record to the next processor unchanged. Though typically, you would not use the Dev Identity processor in a production pipeline, it can be useful in a pipeline fragment to create additional input or output streams.
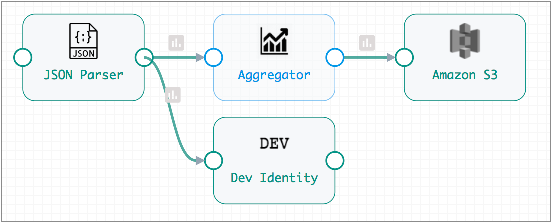
For example, let's say you have several connected processors in a fragment that ends with a destination stage, resulting in a single input stream and no output streams, as follows:
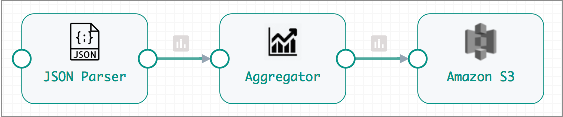
But in addition to writing the data to the Amazon S3 destination in the fragment, you want to pass the data processed by the JSON Parser to the pipeline for additional processing.
To create an output stream for the fragment, connect the JSON Parser processor to a Dev Identity processor, and leave the Dev Identity processor unconnected, as follows:
The resulting fragment stage includes an output stream that passes records processed by the JSON Parser to the pipeline:

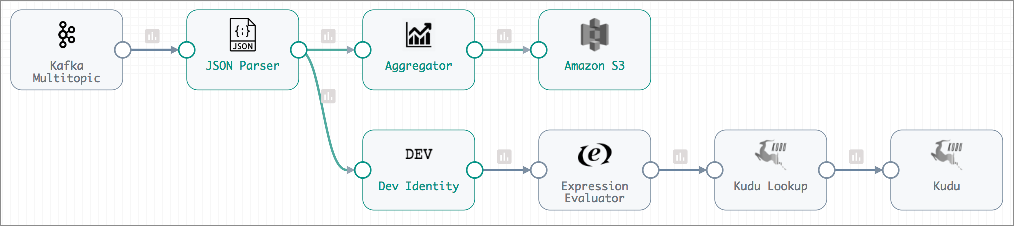
With the fragment expanded, you can see how the Dev Identity processor passes data from the JSON Parser in the fragment to the additional branch defined in pipeline:
Data Preview
You can use data preview to help develop or test a pipeline fragment.
As with data preview for a pipeline, when you preview a fragment, Pipeline Designer passes data through the fragment and allows you to review how the data passes and changes through each stage.
You can use a test origin to provide source data for data preview. This can be especially useful when working with a fragment that does not include an origin. When the fragment contains an origin, you can also use the origin to provide source data for the preview.
For more information about test origins, see Test Origin for Preview. For details about previewing data, see Data Preview Overview.
Explicit Validation
At this time, you cannot use explicit validation when designing pipeline fragments. To perform validation for a fragment, publish the fragment and validate the fragment in a test pipeline.
In a test pipeline, you can connect a fragment to additional stages to create a complete pipeline, then use explicit validation.
- Connect a development origin to any fragment input streams.
- Connect any fragment output streams to a Trash destination.
- Use the Validate icon to validate the pipeline and fragment.
For example, say you want to validate the processing logic of the following Flatten and Mask fragment:
To test fragment processing, publish the fragment and add it to a pipeline.
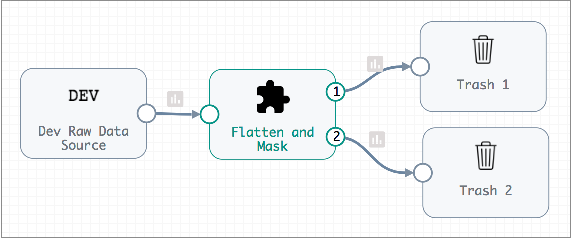
To create a pipeline that passes implicit validation, you connect a Dev Raw Data Source - or any development origin - to the fragment input stream, then connect the fragment output streams to Trash destinations as follows:
When you validate the pipeline, validation error messages display and are highlighted in the associated stage, as with any pipeline:
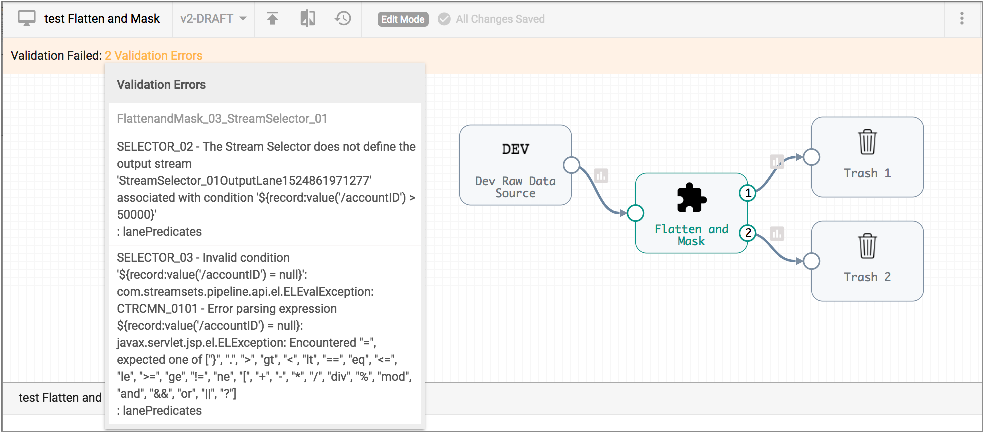
To view the stage with the problem, expand the fragment and review the stage properties:

In this case, the Stream Selector conditions are invalid, so you can edit the fragment to update the expressions in the processor, then republish the fragment, update the pipeline to use the latest fragment version, and then validate the pipeline again.
Fragment Publishing Requirements
A fragment must meet several validation requirements to be published.
- At least one input or output stream must remain unconnected.
You cannot use a complete pipeline as a pipeline fragment.
- All stages in the fragment must be connected.
The pipeline canvas cannot include any unconnected stages when you publish the fragment.
- The number of input and output streams cannot change between fragment
versions.
When first published, the number of input and output streams in a fragment is defined. All subsequent versions must maintain the same number of input and output streams. This helps prevent invalidating pipelines that use the fragment.